Set General QC Options
Before beginning to QC, there are several general QC options you may want to set. You may set these options as needed for each QC session.
-
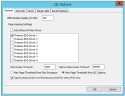
Choose Tools > QC Options from the menu bar to display the QC Options dialog box.
-
Click the General tab.
-
Select from the following options:
Option
Description
JPEG Rotate Quality
The default value of 100 represents a mean value that is best for preserving the image’s original size during rotation. If the value is changed to 255, for example, then the image will be made larger than what it originally started as.
Select Specific Printer Drivers
Select the printer drivers you want to use when reprocessing items. You can choose one, some, or all of the printer drivers.
Auto-Detect Printer Driver
If you want eCapture to automatically detect the next printer driver to use, select this option.
If multiple people are QCing in a Terminal Services session, it is necessary to select the Auto-Detect Printer Driver option since eCapture installs up to 8 printer drivers. Therefore, there can only be a maximum of 8 reprocess actions occurring on a machine, though the number of viewers is almost unlimited.
Reprocess Timeout
Select a range between 30 and 3600 seconds (1 hour). 1800 seconds is the default timeout setting for normal reprocessing.
Native Reprocess Timeout
Select a range between 30 and 86400 seconds. 86400 seconds is the default timeout setting for native reprocessing.
Max Page Threshold from Flex Processor
Uses the Max page value set for the Flex Processor Rule.
Max Page Threshold from QC Options
Uses the settings from the Reprocessing Options, General Options screen.
Apply passwords from the password list for native file view
This option is selected by default. When a password-protected document is selected, the password list for the project associated with the document is loaded and supplied to the Native file viewer on an individual basis. This process continues until the correct password is supplied or all passwords were tried. A progress dialog displays during this process. To stop the progress, click Cancel. The system will stop supplying passwords and the 'protected' message displays in the Native file viewer. Clear this option to avoid loading the passwords.

Related Topics